Recipe to make basic sourdough bread with step by step instructions video. It requires no yeast and has both whole-wheat and bread flours. This is a great sourdough bread for beginner bakers.
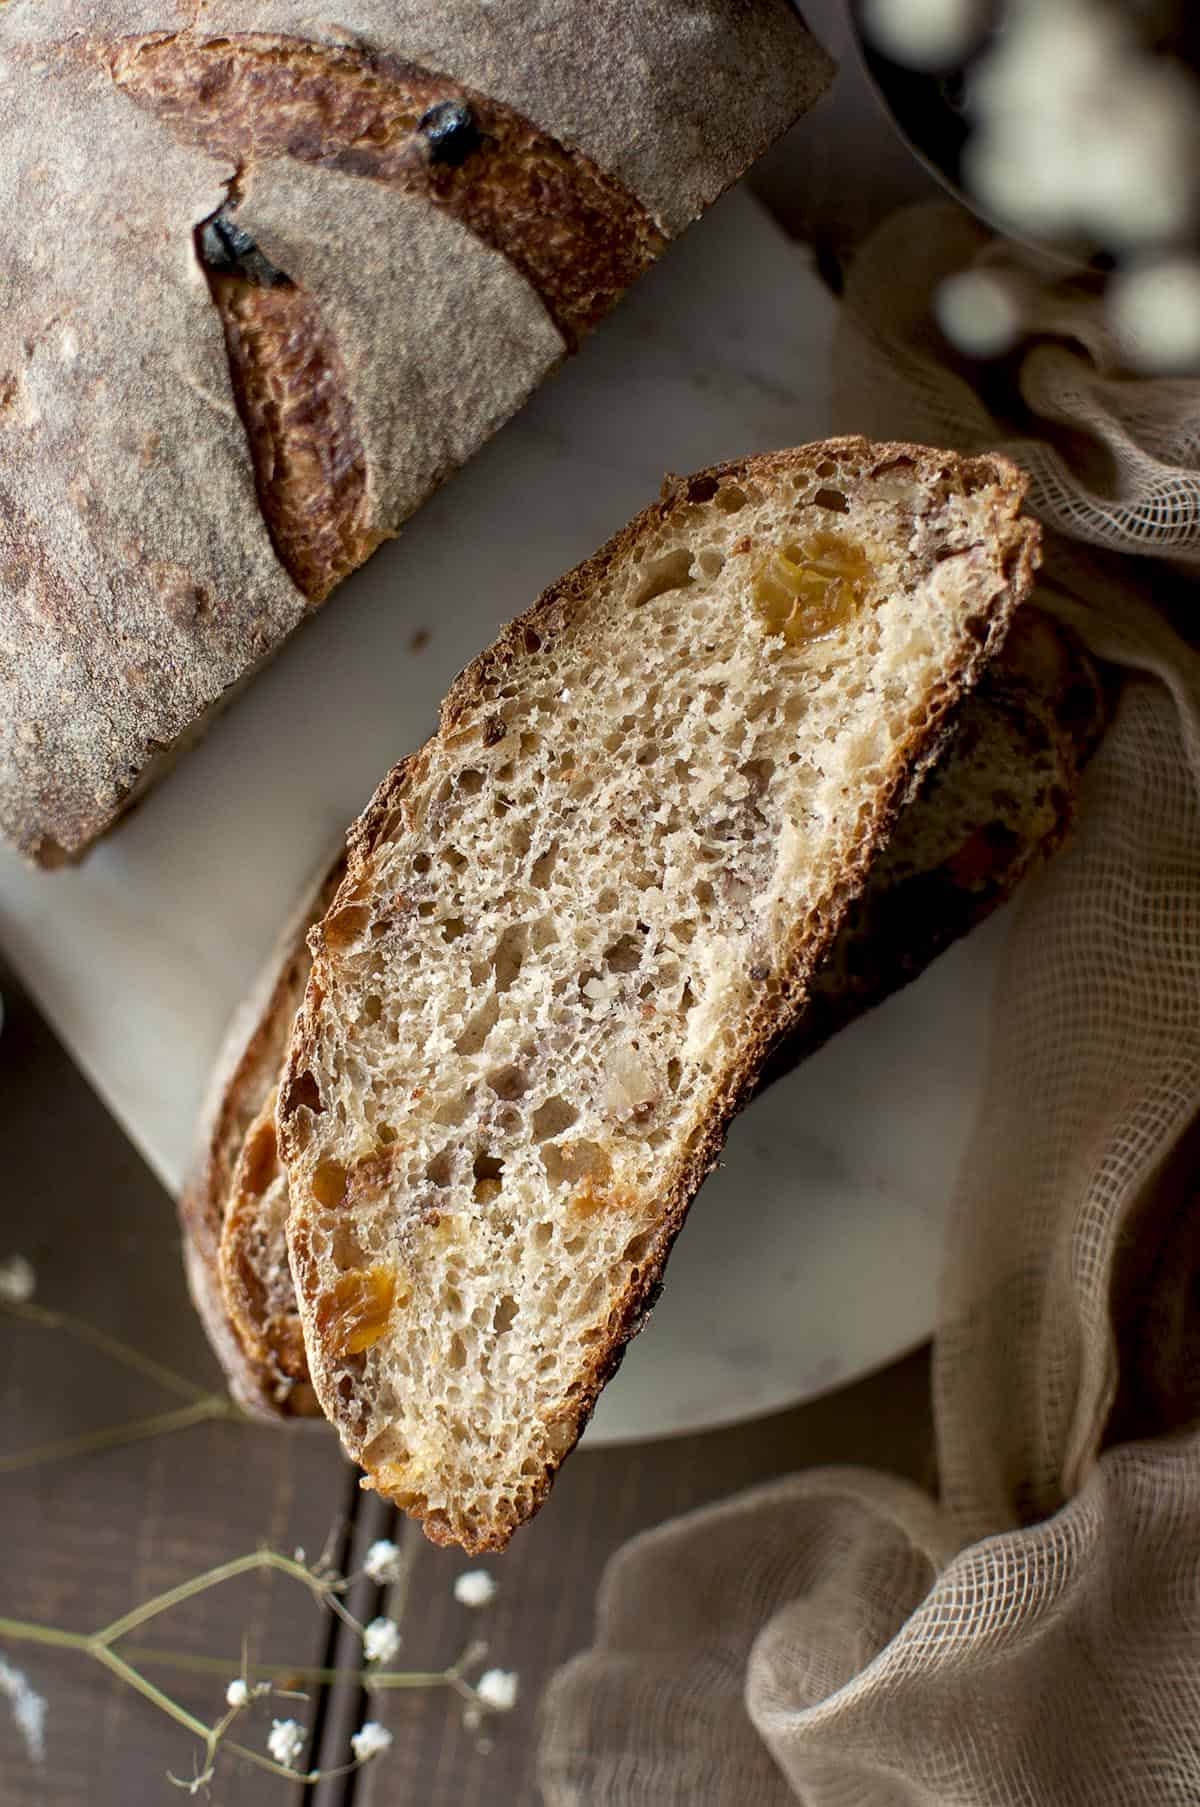
It has a lovely earthy flavor and is an ideal recipe to use as a base for flavored loaves. I love it with just a tab of butter or even use it for sandwiches.
This post contains affiliate links to Amazon and other sites. I will earn a commission from qualifying purchases through those links. This blog generates income via ads. Click here to read my affiliate links policy.
Table of contents
About the recipe
Sourdough baking is a science that seems daunting in the beginning. But you once you get the hang of it, it is one of the most satisfying and therapeutic things to do.
I am not into full time sourdough bread baking. I feed my sourdough starter once every 1~2 weeks and that is usually when I bake my bread.
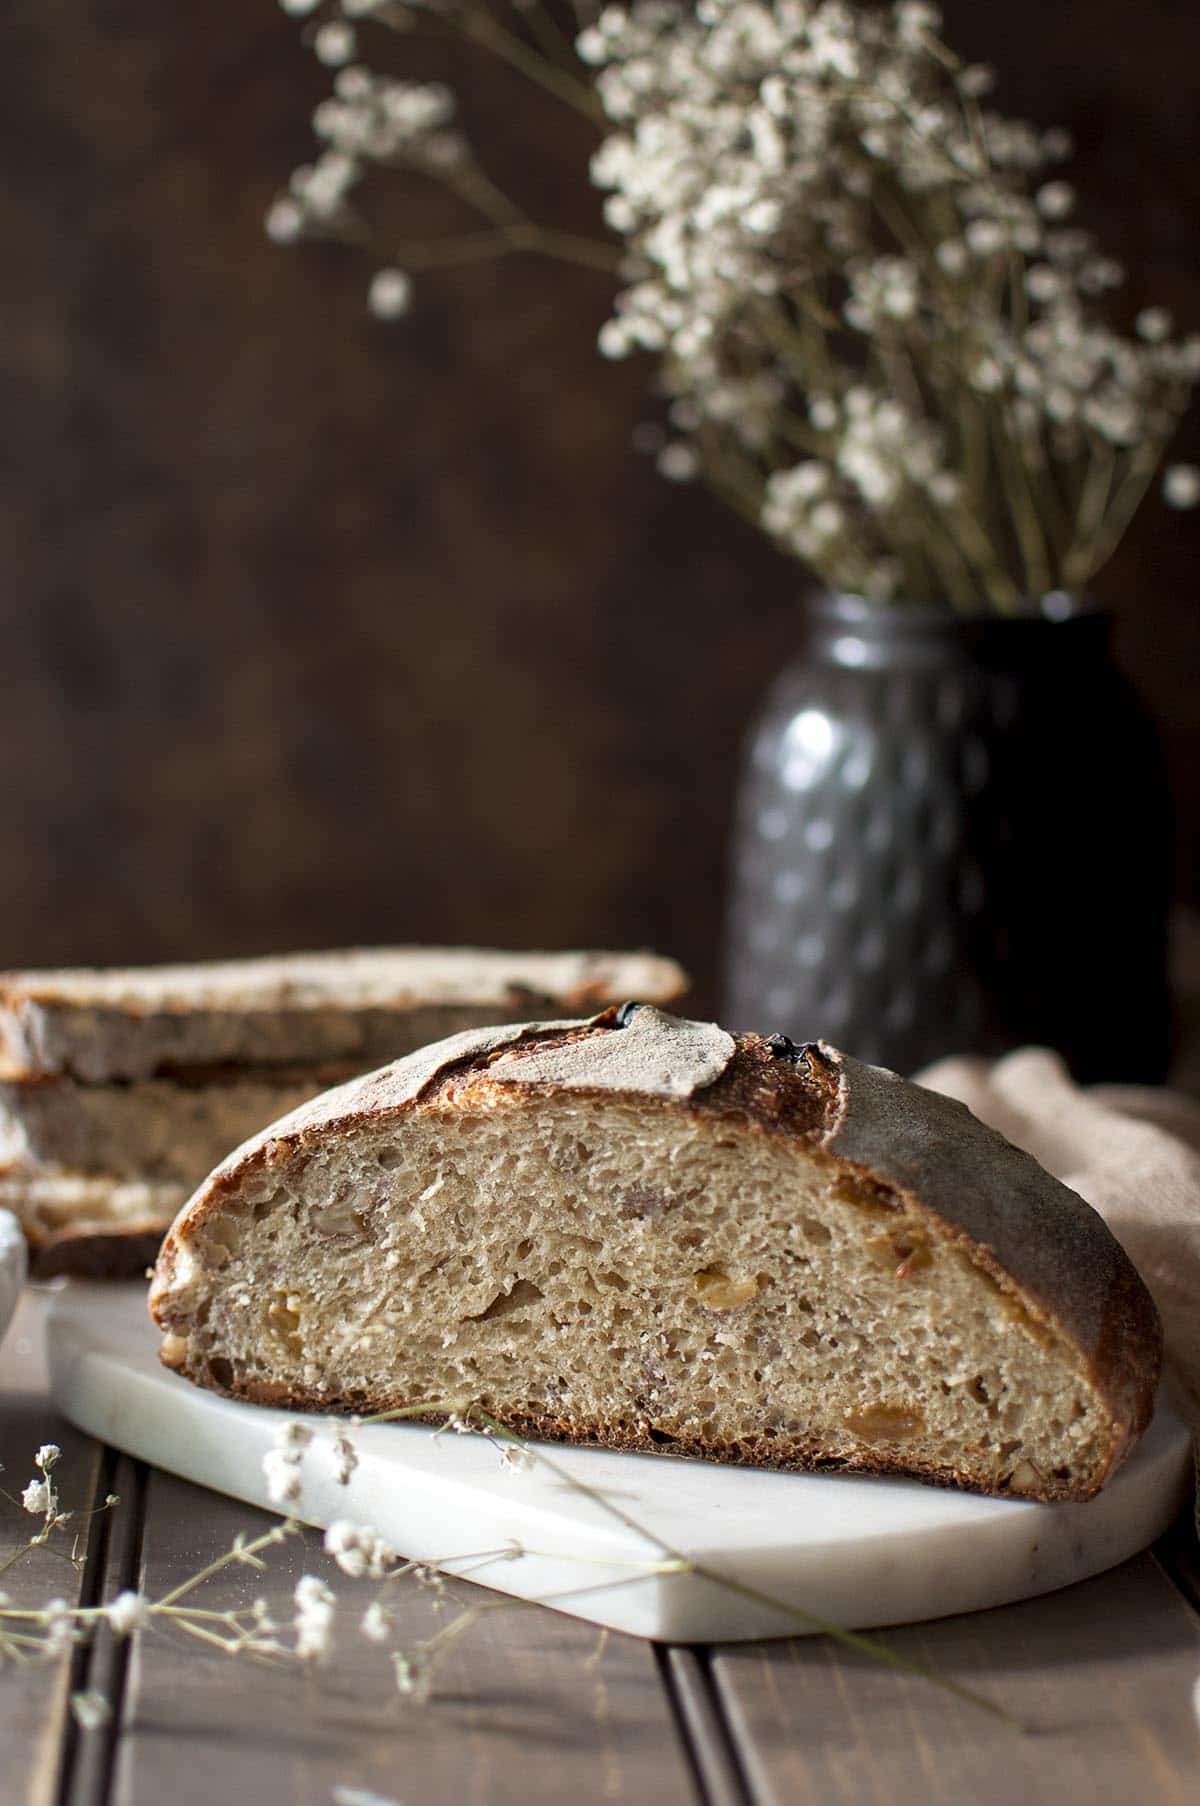
This is my go-to simple sourdough loaf. It is an easy no yeast bread recipe that is very versatile. You can make it just basic with no add-ins or make it nutty and fruity. In this version, I added some raisins and chopped walnuts.
All you need is an bubbly and active sourdough starter and a few basic ingredients to make this delicious amazing sourdough bread. You can bake it the same day if you want or let the dough bulk ferment overnight in the fridge and bake in the morning.
Ingredients
For the details of the exact quantities of each ingredient and the list of ingredients needed, check the printable recipe card below.
Here is what you need to make this basic sourdough bread recipe:
- Active sourdough starter - the night before you want to bake the bread, feed your starter, so that it will be ripe and ready to bake.*
- Bread flour - has higher protein content than all-purpose flour. I highly recommend to use it for the best texture.
- Whole wheat flour - I love to add whole wheat flour to add fiber to the bake. Also whole grain adds a complexity of flavor and texture to the bread.
- Water - chlorine in water might affect the wild yeast activity, so try and use filtered water. I also use lukewarm water.
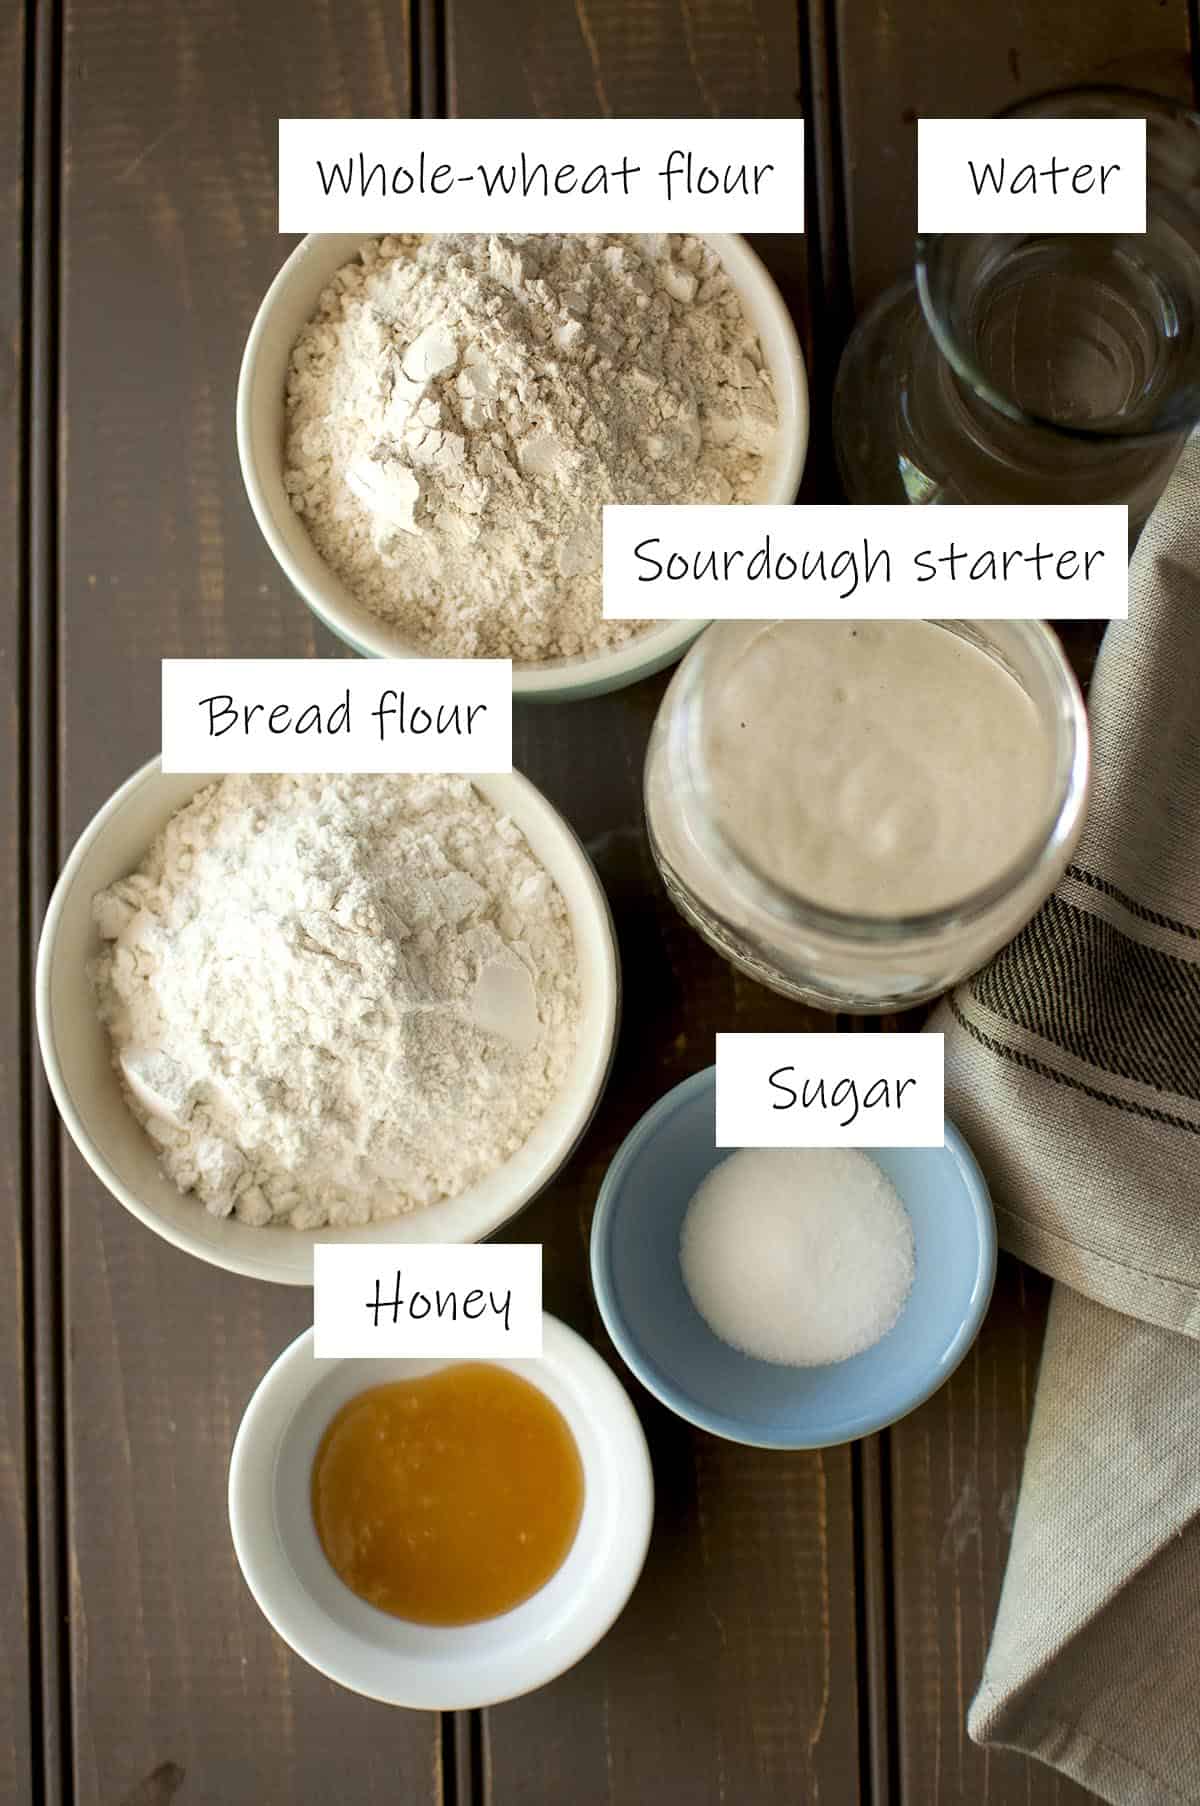
- Honey - substitute with sugar or agave nectar
- Salt
- Add-ins - optional. I recommend that you start adding add-ins after you get comfortable with this simple sourdough bread recipe.
- You also need either a cast iron combo cooker or a Dutch oven with lid to bake the bread.
Instructions
For the detailed instructions on how to make the recipe with exact timings, check the printable recipe card below.
Here is how to make this simple sourdough loaf.
The first thing to make sure is that you have an active starter. Make sure to feed your starter the night before and in the morning it will be bubbly and ready to bake with.
Autolyse
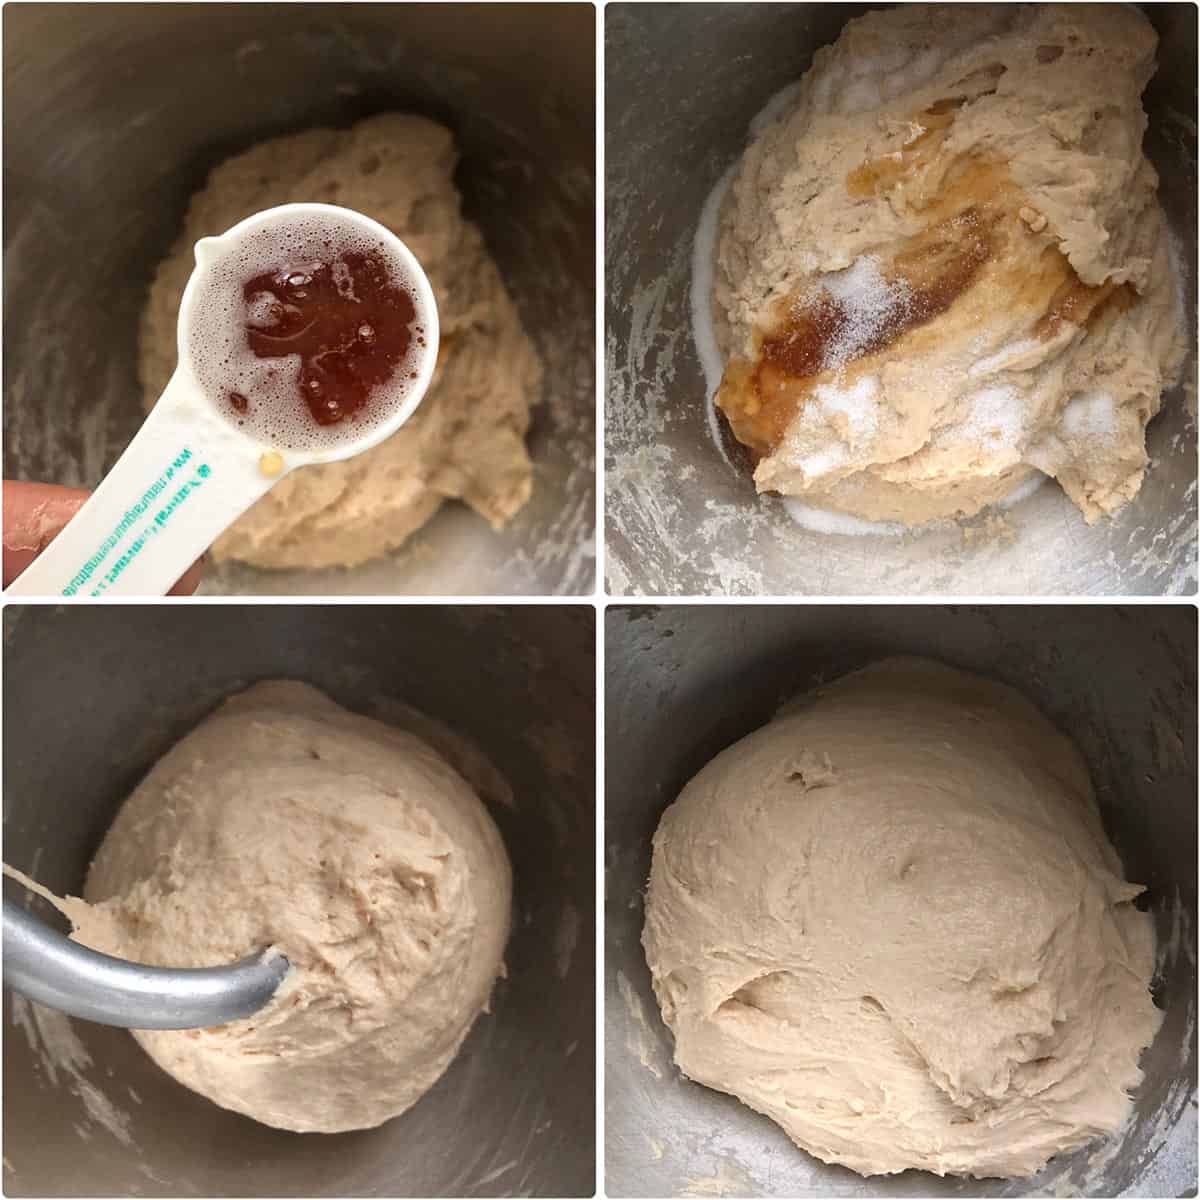
In a large mixing bowl or the bowl of the stand mixer, combine bread & whole wheat flours, sourdough starter and lukewarm water. Mix well until they are well combined and the flour is thoroughly moistened. Cover the bowl with plastic wrap or kitchen towel and rest in a warm area for 20 minutes.

Stir in the honey and salt on the slowest speed. Once they are incorporated, turn up the mixer speed and knead the dough for 2~3 minutes. Cover the bowl and let the dough rise for 30 minutes.
Adding Add-ins
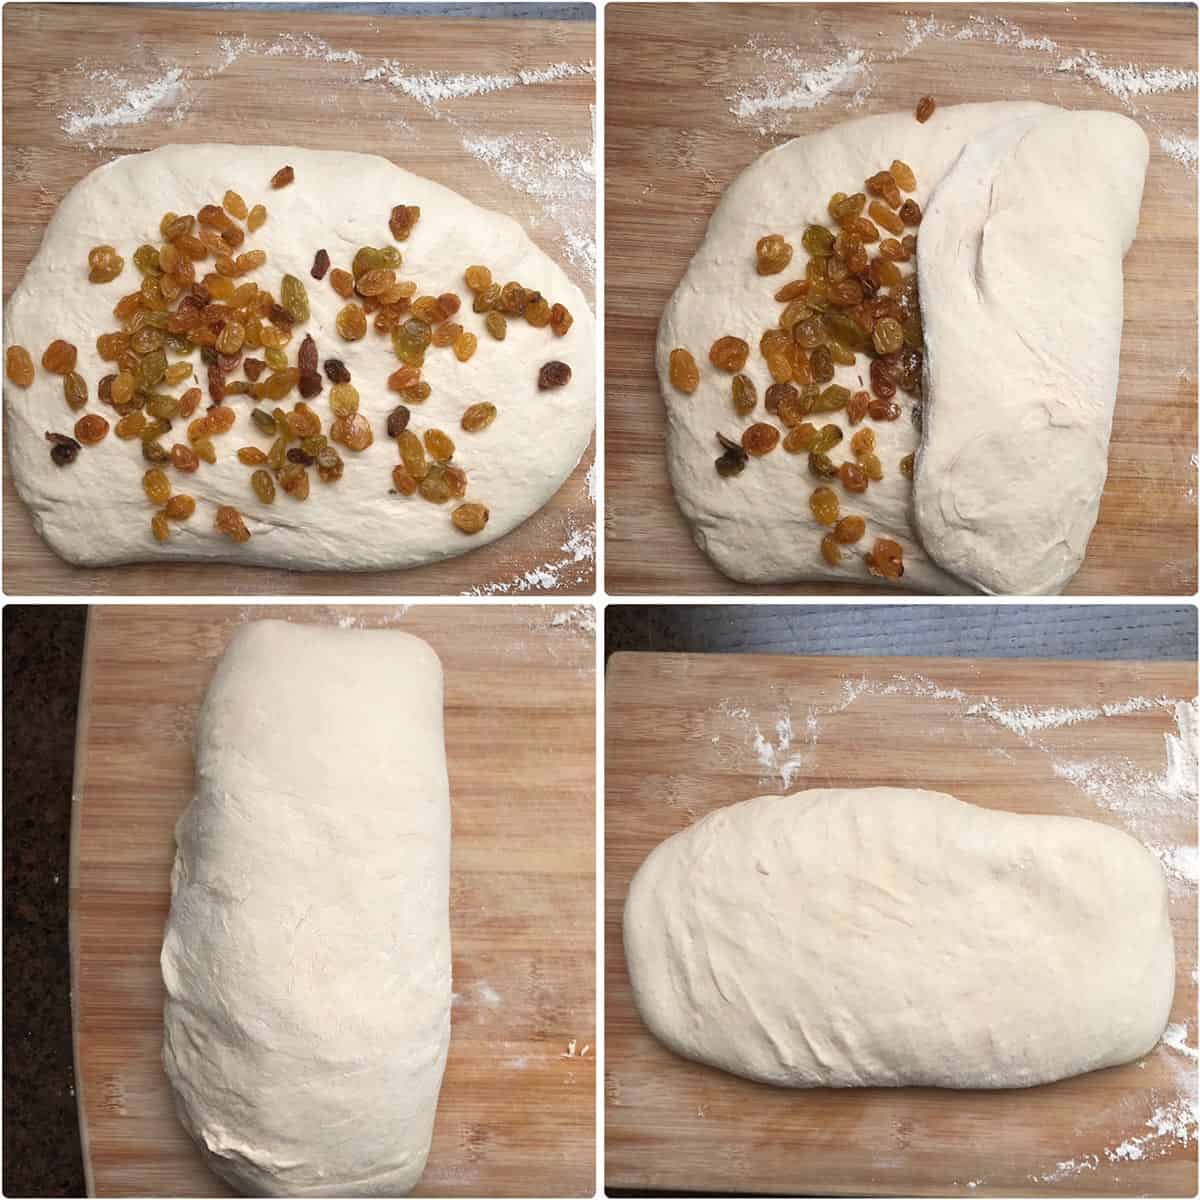
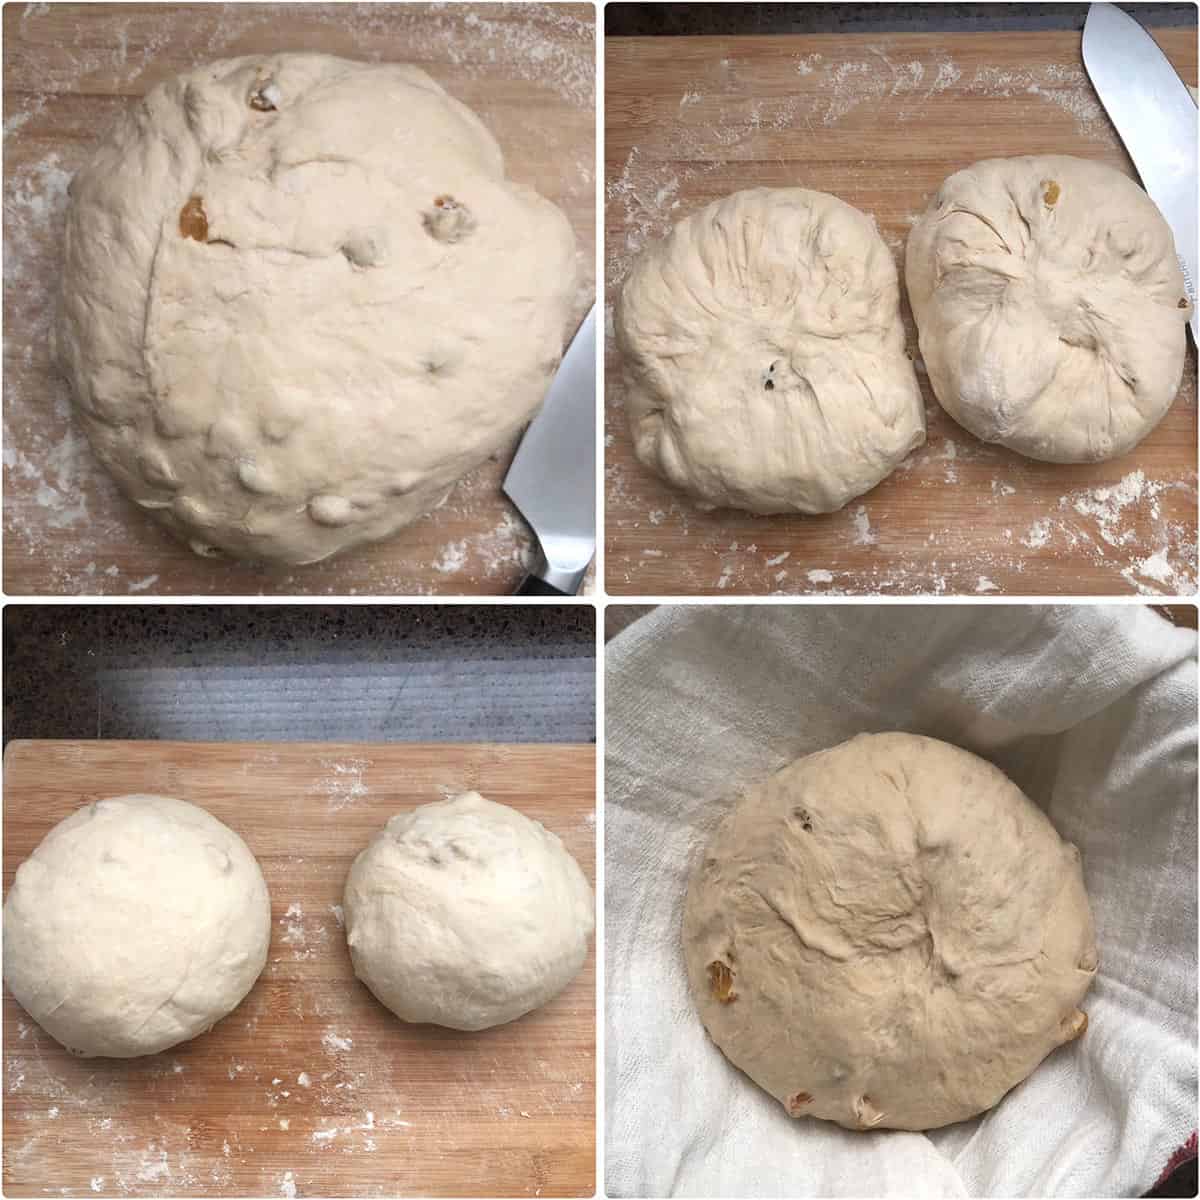
Turn the dough out onto a well-floured surface. Using floured hands, lightly pat the dough out into a rough rectangle, about 9"x12". Sprinkle the raisins evenly on top. Using a bench scraper or you hands, fold the dough into thirds over the raisins, patting the dough lightly to remove any excess flour as you fold.
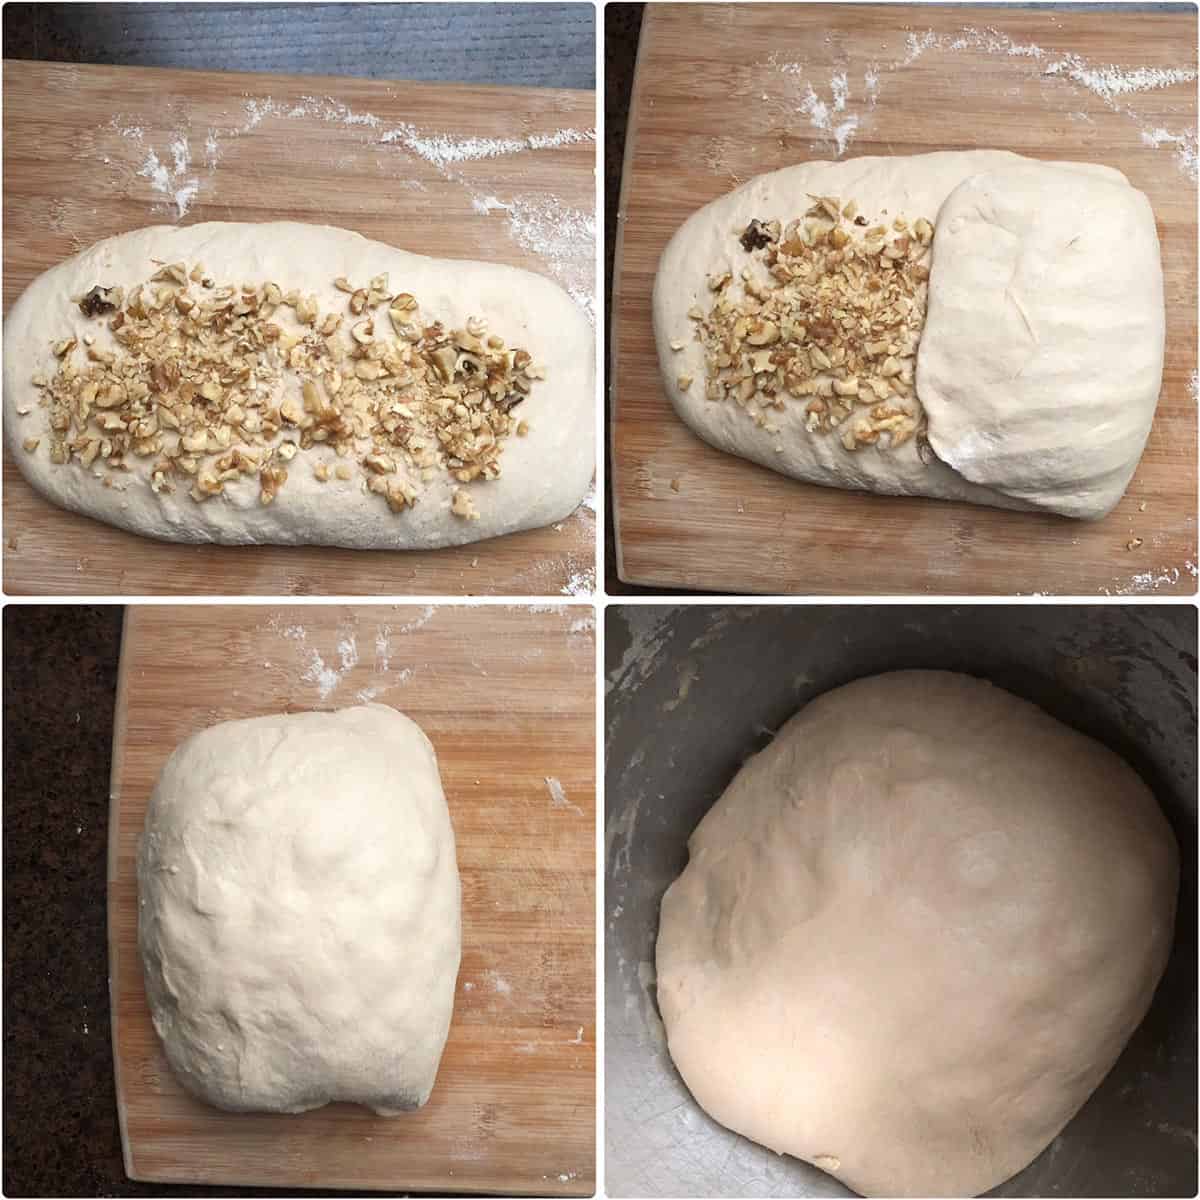
Now pat the dough into rectangle again sealing the raisins, and sprinkle with the walnuts. Use a bench scraper or your hands, fold the dough in thirds in the opposite direction. This is a sticky dough at this stage, but it will smooth out as it rises and is folded repeatedly. Cover and set aside in a warm area for 30 minutes.
Stretch and Fold
This step build the dough strength as well as redistribute the carbon dioxide produced by the yeast. With well-floured hands, pat the dough out to a rough rectangle. Using a metal bench scraper, fold the dough in thirds, as you would a business letter. Use your hands or a pastry brush to pat away any excess flour. You will have a horizontal strip of dough.
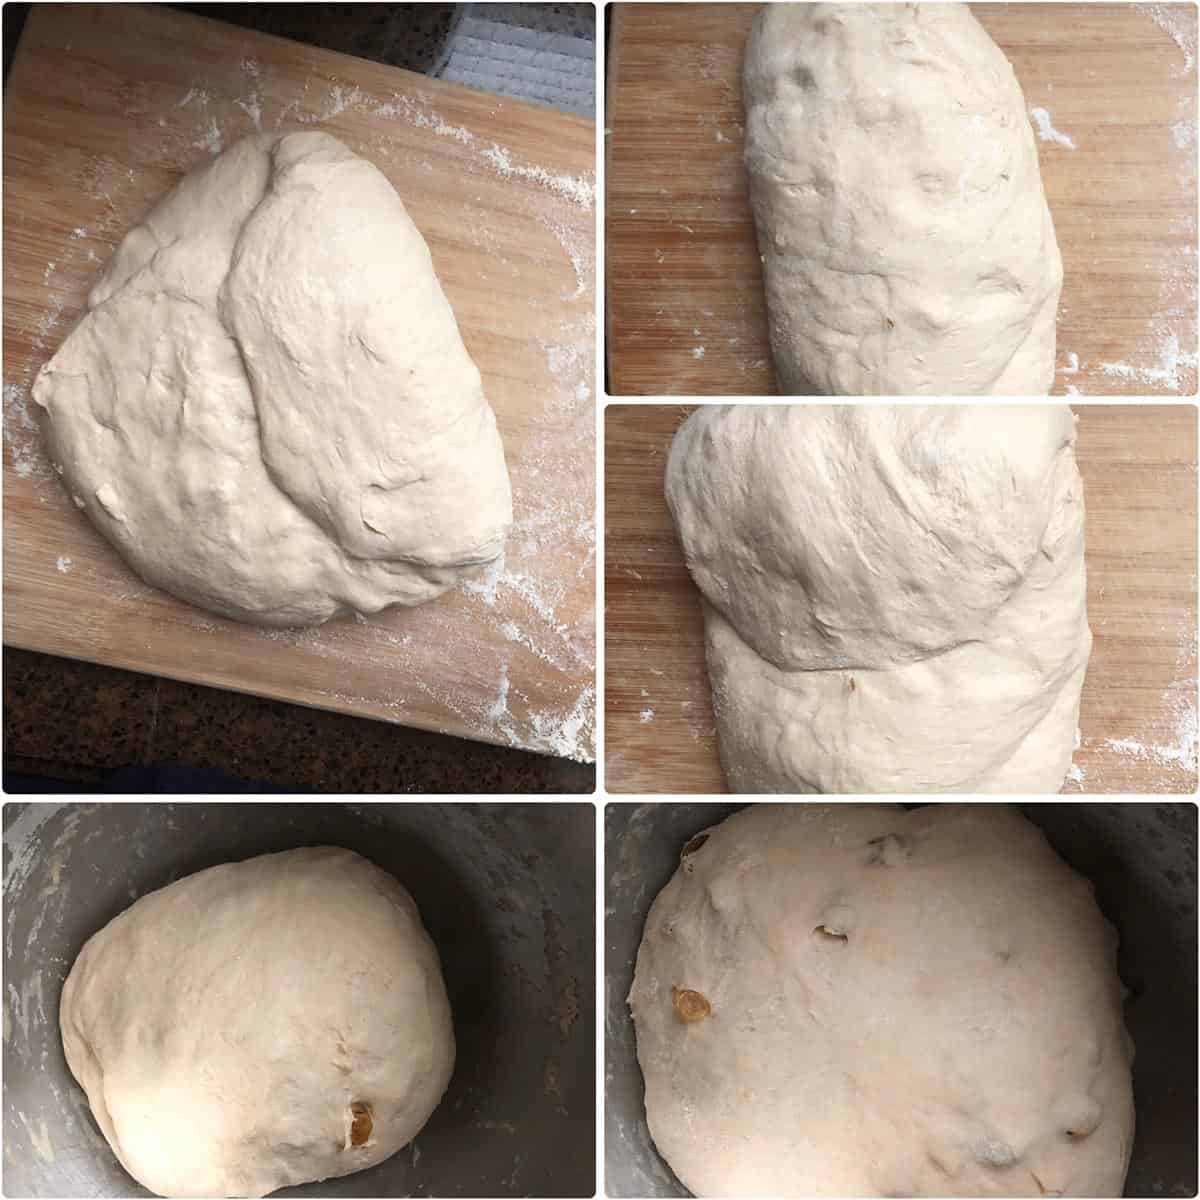
Again using your bench scraper or your hands, fold the dough, but this time in the opposite direction. You will be left with a packet of dough to return to the bowl. Cover the bowl and set it aside to rise for 30 minutes.
Perform total 4 sets of stretch and folds spaced out by 30 minutes. Make sure to place the dough back in the warm area after each fold.
Pre-shape
After the stretch and folding, the dough is ready to shape. On a floured work surface, scrape the dough and divide it in half. Pull the edges of each half into the center to form a rough round. Let the dough rest, rough side up, on a floured surface for 15~20 minutes. This rest will allow you to shape the dough more firmly.
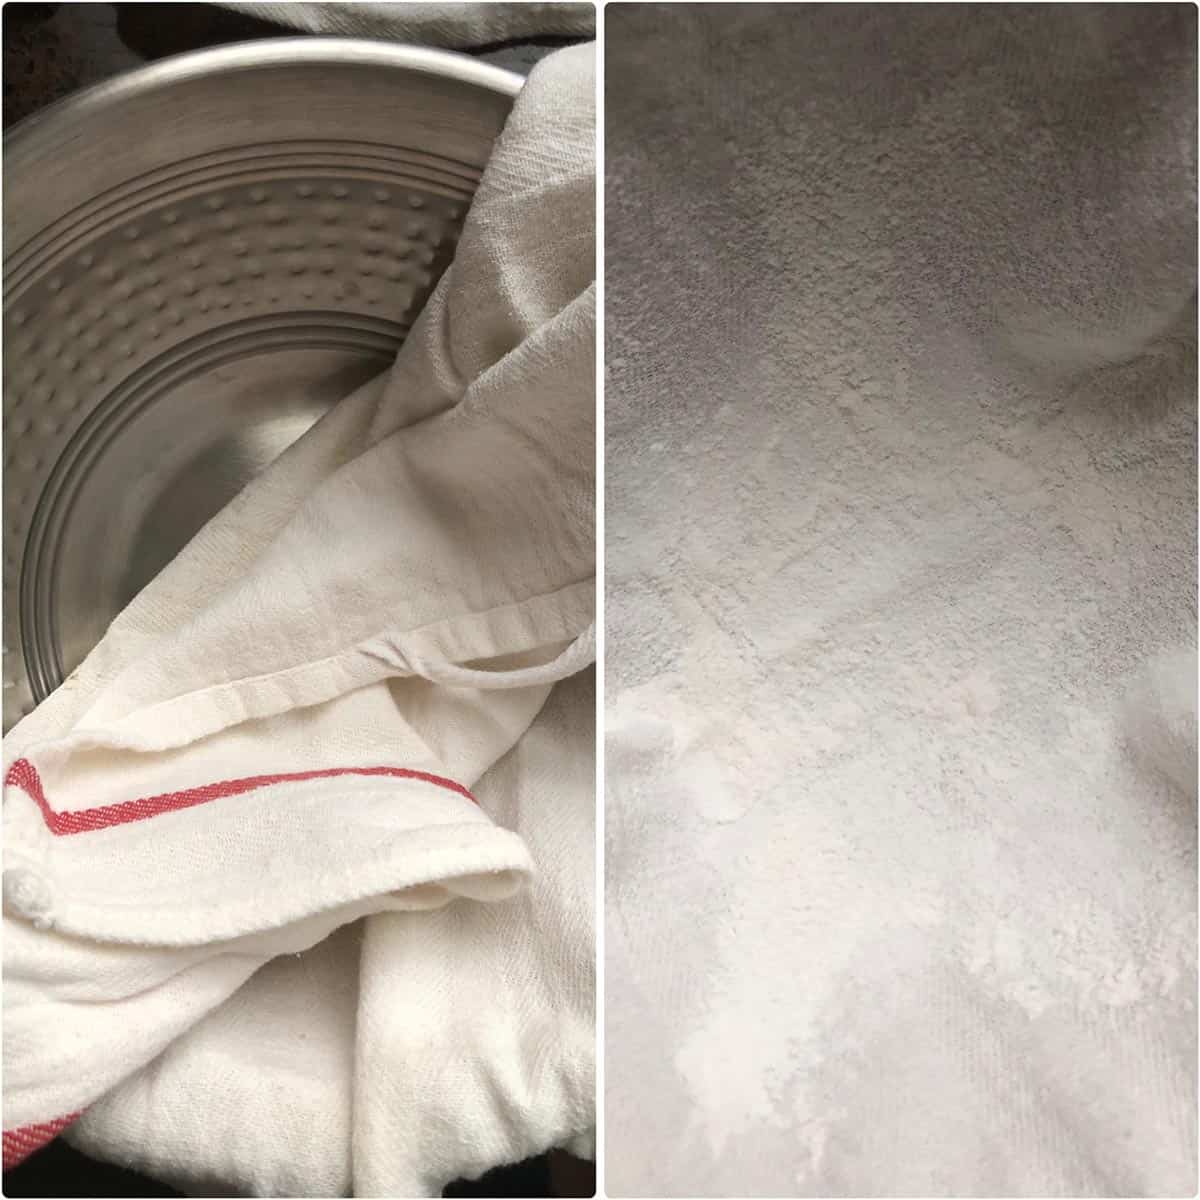
While the dough is resting, place a linen tea towel* in 2 bowls or colanders or round baskets. If you have bannetons or brotforms, use them. Heavily flour them with either rice flour or bread flour and set aside until ready to use.
Shape
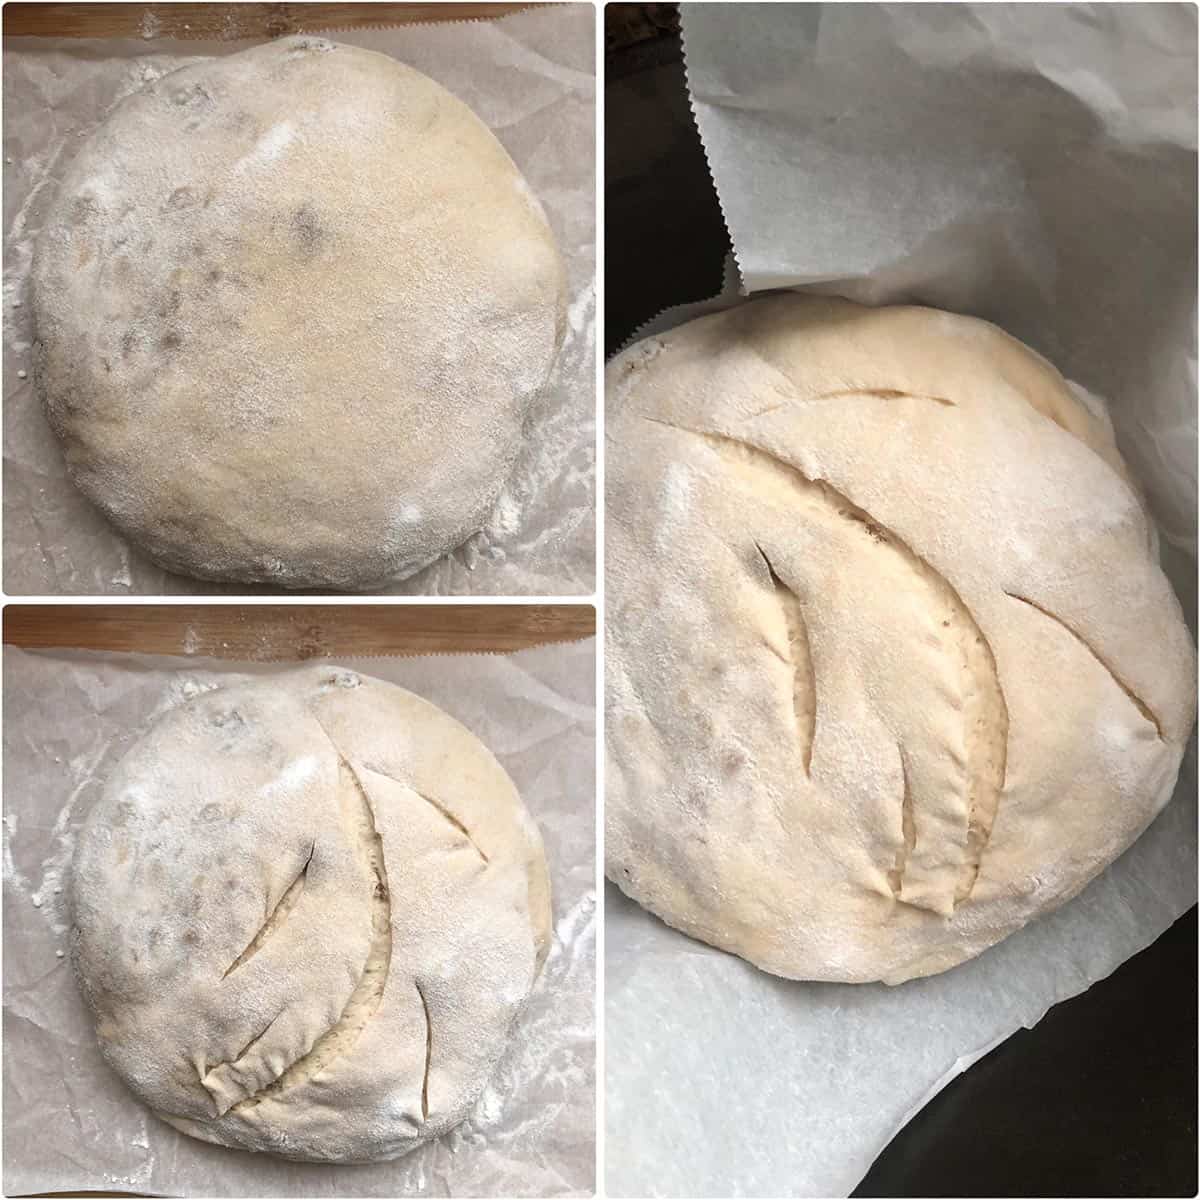
After 20 minutes, it is time for final shape. Using floured hands, turn the dough over so that seam of the shaped loaf is on the bottom. Begin tightening the surface by pulling the loaf toward you repeatedly on the work surface. Make sure that the dough is slightly taut and uniformly round. The goal is equal tension all over the loaf's surface.
Place the shaped boules in the prepared bannetons or other proofing baskets. Cover them well with plastic wrap and let them rest in a warm place for 2~2½ hours.
You will know that the bread is ready to bake when you poke it gently with a floured finger, it should fill back in slowly not quickly.
If you prefer to bake the loaves the next day, then proof for 1 hour and then place the bowls in the fridge for overnight bulk fermentation.
Bake
About 30~40 minutes before you're ready to bake, place a cast iron combo cooker or a Dutch oven with lid on the middle rack of the oven. Preheat the oven to 450°F.
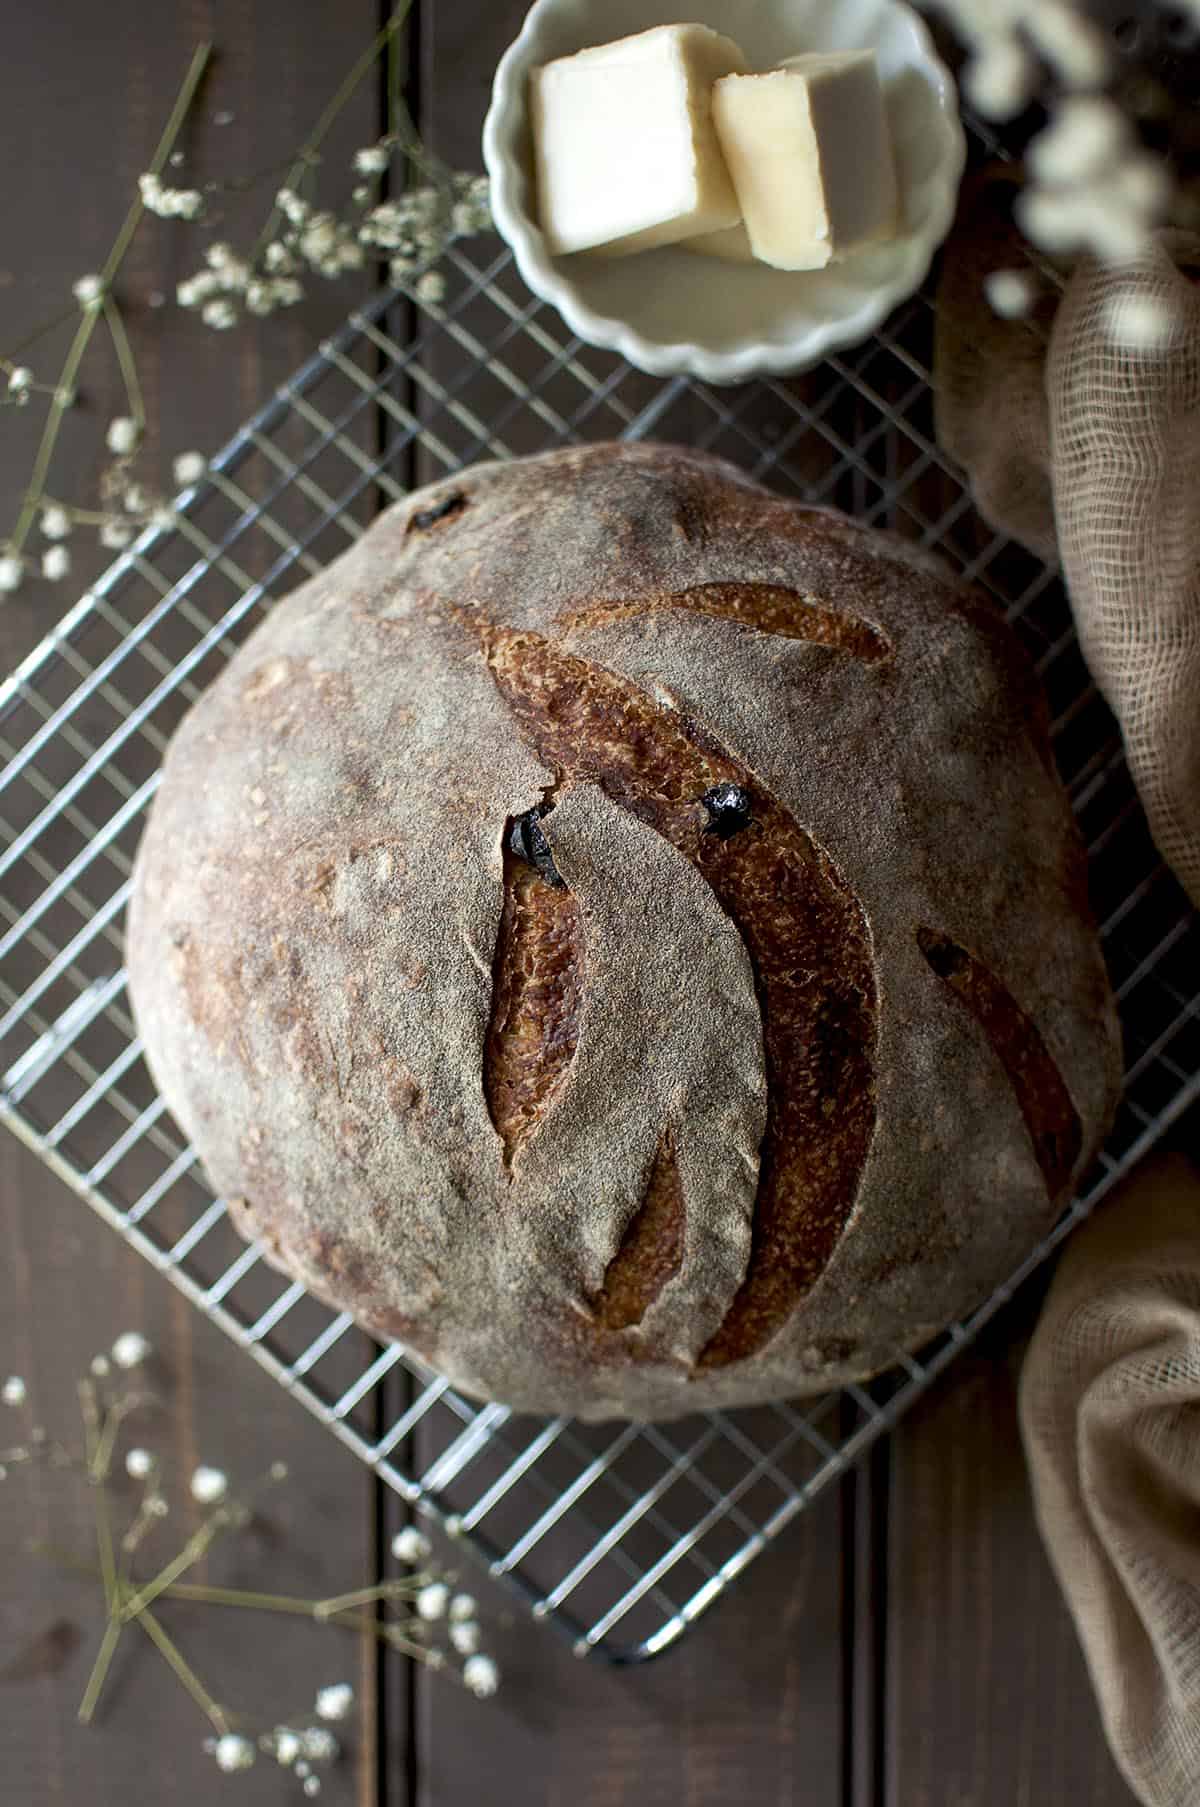
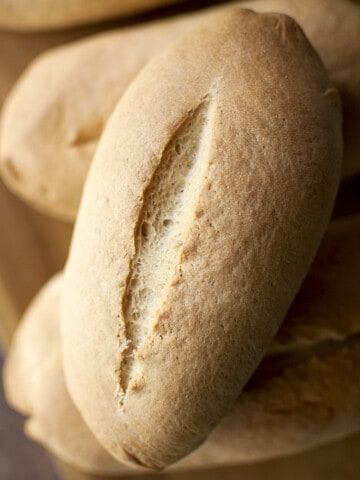
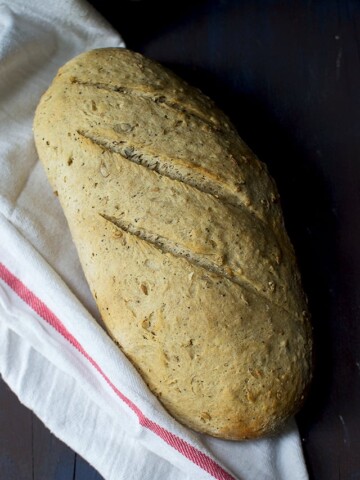
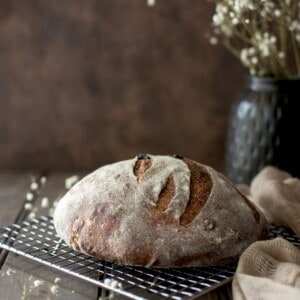
Turn the boules out of the bowls onto a piece of parchment. Using a sharp knife or blade, slash them.
Wearing oven mitts, remove the hot pan from the oven and carefully transfer the bread, parchment and all into the pan. Place the lid on top and bake for 15 minutes.
Carefully remove the lid and lower the oven temperature to 425°F and bake for another 25~30 minutes, or until the loaf is deep brown and registers an internal temperature of 205~210°F.
Carefully remove the baked bread onto a wire rack and cool completely for at least 1 hour before slicing. Repeat with the second loaf.

Expert Tips
- If you are kneading by hand, this is a wet dough, resist the urge to add more flour. The dough will be quite sticky, that is OK.
- I highly recommend that you weigh your ingredients for this recipe.
- Make sure to use bread flour and not all purpose flour because it has higher protein and works well in this recipe.
- If the dried fruit are too dry, then soak them in warm water for at least 1 hour before using them.
- Warm spot in the house is where the temperature is between 70~80°F, usually the laundry room or over the radiator or near a window.
- Make sure to preheat the cast iron pan or Dutch oven in the oven to ensure that you the bread forms the lovely crust.
- It is important to choose a smooth-textured fabric or your bread dough will get stuck to the material. Linen or cotton work best.
- Please note that the oven temperature needs to be reduced after the first 15 minutes of baking and the lid comes off too at this point.
- If you prefer to bake the loaves the next day, then proof for 1 hour at room temperature. Then place the bowls in the fridge for overnight bulk fermentation. Bake as per the recipe.
- You can leave the dough for bulk fermentation for up to 24 hours but not more than that.
Sample Schedule
Here's a sample schedule to give you an idea how your day is going to look while baking this simple sourdough bread recipe with starter:
- Night before you plan to bake, feed your starter. Take 4 oz. of starter and add 4 oz. each of flour and water. Mix well, cover and set aside overnight.
- 8am: Autolyse dough
- 8:20am: Add honey & sugar
- 8:55am: Laminate with add-ins (if not doing this, then this will be your first fold)
- 9:25am: Fold #1
- 9:55am: Fold #2
- 10:25am: Fold #3
- 10:55am: Fold #4
- 11:25am: Divide the dough & Pre-shape
- 11:45am: Final Shape and final rise for 2~2.5 hours
- 2:45~3:15pm: Bake the bread
Frequently Asked Questions
Overnight bulk fermentation helps improving the flavor of the bread. It is recommended but not required. So, no you do not need to bulk ferment. You can bake it the same day. See the sample schedule above.
I usually follow the schedule to the T as much as possible. But sometimes life happens, so it is OK if you are off by a few minutes here and there. Once you done with the stretch and fold, you can let it rise for 1 hour and leave in the fridge to bake at another time.
Since this recipe makes 2 loaves, I usually store one of the loaf freezer. To do that, I slice completely cooled bread, either wrap it in plastic or foil and then put it in a freezer safe ziploc bag. I store it for up to 1 month.
For the leftover slices, store them well wrapped in a ziploc bag for up to 2 days at room temperature.
You might also like

I love hearing from you!! If you’ve tried this and liked it, then don't forget to let me know. Give a star rating and let me know in the comments below. Also tag me in your creations on Instagram @cooks_hideout. I love sharing photos when people make my recipes. You can use the hashtag #cookshideout too.
Basic Sourdough Bread
Ingredients
- 9 ounces (1 cup) Active Fed Sourdough starter
- 11¼ ounces (2⅔ cups) Bread flour
- 6⅝ ounces (1⅔ cups) Whole-wheat flour
- 12 ounces (1½ cups) Lukewarm Filtered Water, divided
- 1 tablespoon Honey
- 2 teaspoons Salt
- ⅓ cup Raisins or other dried fruit, optional
- ⅓ cup Chopped Walnuts or other nuts, optional
Instructions
- The night before you want to bake the bread, feed your starter, so that it will be ripe and ready to bake. Take 4 oz. of starter and add 4 oz. each of flour and water. Mix well, cover and set aside overnight. This will take about 8~10 hours, depending on the conditions in your kitchen. In the morning, the starter should be bubbly, with a fresh, fruity aroma and not yet receding.
Autolyse:
- In the morning, in a large mixing bowl or the bowl of the stand mixer, combine bread & whole wheat flours, sourdough starter and lukewarm water. Mix well either with hand or with a dough hook, until they are well combined and the flour is thoroughly moistened. Cover the bowl with plastic wrap or kitchen towel and rest in a warm area for 20 minutes.
- After 20 minutes, stir in the honey and salt on the slowest speed or by hand*. Once they are incorporated, turn up the mixer speed and knead the dough for 2~3 minutes. If you are kneading by hand, this is a wet dough, resist the urge to add more flour. The dough will be quite sticky, that is OK. Cover the bowl and let the dough rise for 30 minutes.
Adding Add-ins (optional):
- After 30 minutes, turn the dough out onto a well-floured surface. Using floured hands, lightly pat the dough out into a rough rectangle, about 9"x12". Sprinkle the raisins evenly on top. Using a bench scraper or you hands, fold the dough into thirds over the raisins, patting the dough lightly to remove any excess flour as you fold.
- Now pat the dough into rectangle again sealing the raisins, and sprinkle with the walnuts. Use a bench scraper or your hands, fold the dough in thirds in the opposite direction. This is a sticky dough at this stage, but it will smooth out as it rises and is folded repeatedly. Cover and set aside in a warm area for 30 minutes
Stretch and Fold:
- This step build the dough strength as well as redistribute the carbon dioxide produced by the yeast. With well-floured hands, pat the dough out to a rough rectangle. Using a metal bench scraper, fold the dough in thirds, as you would a business letter. Use your hands or a pastry brush to pat away any excess flour. You will have a horizontal strip of dough. Again using your bench scraper or your hands, fold the dough, but this time in the opposite direction. You will be left with a packet of dough to return to the bowl. Cover the bowl and set it aside to rise for 30 minutes.Perform total 4 sets of stretch and folds spaced out by 30 minutes. Make sure to place the dough back in the warm area after each fold.
Pre-shape:
- After the stretch and folding, the dough is ready to shape. On a floured work surface, scrape the dough and divide it in half. Pull the edges of each half into the center to form a rough round. Let the dough rest, rough side up, on a floured surface for 15~20 minutes. This rest will allow you to shape the dough more firmly.While the dough is resting, place a linen tea towel* in 2 bowls or colanders or round baskets. If you have bannetons or brotforms, use them. Heavily flour them with either rice flour or bread flour and set aside until ready to use.
Shape:
- After 20 minutes, it is time for final shape. Using floured hands, turn the dough over so that seam of the shaped loaf is on the bottom. Begin tightening the surface by pulling the loaf toward you repeatedly on the work surface. Make sure that the dough is slightly taut and uniformly round. The goal is equal tension all over the loaf's surface. Place the shaped boules in the prepared bannetons or other proofing baskets. Cover them well with plastic wrap and let them rest in a warm place for 2~2½ hours. You will know that the bread is ready to bake when you poke it gently with a floured finger, it should fill back in slowly not quickly.If you prefer to bake the loaves the next day, then proof for 1 hour and then place the bowls in the fridge for overnight bulk fermentation.
Bake:
- About 30~40 minutes before you're ready to bake, place a cast iron combo cooker or a Dutch oven with lid on the middle rack of the oven. Preheat the oven to 450°F.
- Turn the boules out of the bowls onto a piece of parchment. Using a sharp knife or blade, slash them.
- Wearing oven mitts, remove the hot pan from the oven and carefully transfer the bread, parchment and all into the pan. Place the lid on top and bake for 15 minutes.Carefully remove the lid and lower the oven temperature to 425°F and bake for another 25~30 minutes, or until the loaf is deep brown and registers an internal temperature of 205~210°F.
- Carefully remove the baked bread onto a wire rack and cool completely for at least 1 hour before slicing. Repeat with the second loaf.
Video
Notes
- If you are kneading by hand, this is a wet dough, resist the urge to add more flour. The dough will be quite sticky, that is OK.
- I highly recommend that you weigh your ingredients for this recipe.
- Make sure to use bread flour and not all purpose flour because it has higher protein and works well in this recipe.
- If the dried fruit are too dry, then soak them in warm water for at least 1 hour before using them.
- Warm spot in the house is where the temperature is between 70~80°F, usually the laundry room or over the radiator or near a window.
- Make sure to preheat the cast iron pan or Dutch oven in the oven to ensure that you the bread forms the lovely crust.
- It is important to choose a smooth-textured fabric or your bread dough will get stuck to the material. Linen or cotton work best.
- Please note that the oven temperature needs to be reduced after the first 15 minutes of baking and the lid comes off too at this point.
- If you prefer to bake the loaves the next day, then proof for 1 hour at room temperature. Then place the bowls in the fridge for overnight bulk fermentation. Bake as per the recipe.
- You can leave the dough for bulk fermentation for up to 24 hours but not more than that.
- To store the leftover bread:
- Slice completely cooled bread, then either wrap it in plastic or foil and put it in a freezer safe ziploc bag. Can be stored for up to a month in the freezer.
- For the leftover slices, store them well wrapped in a ziploc bag for up to 2 days at room temperature.


Usha Rao
I am yet to bake my sourdough bread and I have not even fed my poor starter since you gave it to me back in Spring. Bread looks soft and perfectly baked.
Sapana Behl
Wow ! I love the texture of this bread.Looks so soft and delicious.
Sowmya :)
Nothing to beat freshly made bread! And yours looks so flavorsome and delicious!
Nalini's Kitchen
Bread looks absolutely stunning Pavani,got a very nice texture..
Divyas Culinary Journey
Bread looks great - so soft and perfectly baked. Beautifully clicked pictures!
Priya Suresh
Such a stunning loaf, and simply love the crumb of this bread..Beautiful bread.
Global Tastes & Travels Inc.
what a beautfful soft texture - send some my way for tomorrow's breakfast
Global Tastes & Travels Inc.
what a beautfful soft texture - send some my way for tomorrow's breakfast
Priya Srinivasan
Love the texture pavani!! I m yet to venture into sourdough territory, looking at your bread I m greatly tempted!
Srivalli
What a lovely way to start the Bakeathon Pavani...love your pictures and yes this is bookmarked too!
Amara Annapaneni
Bread is so soft, I'm sure it tasted delicious. Bookmarked....
Bless my food by Payal
I fully stand by your words' "sourdough bread making is one of the most satisfying and therapeutic things to do."
I love baking breads and would love to try this version very soon. Thanks for sharing.
Mayuri Patel
It has been ages since I've baked a sourdough bread and the starter is sitting ideal in the fridge. Your nutty and fruity sourdough bread is temptation enough to revive the starter and start baking. Perfectly baked bread with an awesome crust.
Seema Sriram
This is one of the best posts for a basic sourdough bread, I have come across. I am newbie to sourdough bread and I loved your expert tips. So helpful.
Uma Srinivas
I need a basic sourdough bread recipe! I agree this will be good to eat lightly toasted or with some butter & jam for breakfast.
Lata Lala
This sourdough bread seems to be a perfect recipe for me as it requires no yeast and has both whole-wheat and bread flours.
It has turned out perfect with crisp top and soft from inside.
Vandana
This sourdough bread looks so perfect. The FAQs and expert advice are really helpful. I am really tempted to try it at home.
Jagruti's Cooking Odyssey
I am yet to bake a loaf of sourdough bread, lol I don't bake enough, my family says too. What an informative and useful post, thanks for sharing it.
Avin Kohli
What a lovely sour dough bread. I should dive in sourdough baking soon. And you are tempting me.
Sapana
Sourdough bread baking has become my favorite thing to do on the weekends. The moment my alarm sets to feed the starter, I literally start jumping with joy. Your tips and tricks are so amazing Pavani.