It's been a while that I sent an entry to Susan @ Well Seasoned Cook's famous My Legume Love Affair (MLLA) event. This month's edition is being hosted by lovely Nupur @ One Hot Stove. I love legumes and they are integral part of my cooking. My 5 year old LOVES dal chawal and I'm very glad that I can sneak in any veggie in to a dal and he'll eat it without complaining. So much for little victories 🙂
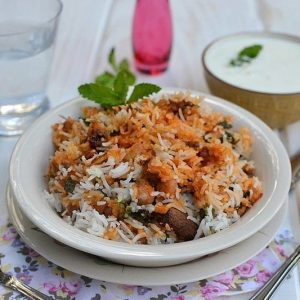
This Dal Biryani recipe is adapted from one of the Telugu cooking shows that I recently watched. I really loved the idea of using dal in biryani, it makes it a complete dish with the required carbs, protein and fat. It is filling and delicious to boot.
The original recipe was for 'Panchratan Dal Biryani' with 5 different legumes. But I remember a nutrition expert on one of the other cooking shows saying that 'adding more good things to a dish is not necessarily good for health'. She mentioned that using a lot of different beans/ nuts/ oils/ seeds (anything for that matter) slows down the body from absorbing the good nutrients from each of the ingredient. I don't know if that is true or not, but I used only 3 legumes -- Chickpeas, Adzuki beans and Moong beans. But the recipe is versatile and any sturdy legume that doesn't become mushy when cooked can be used.
This dish requires a little bit of prep work and makes quite a few dirty dishes, but the end resuly is well worth the effort. I'm getting a hang of making layered biryanis these days and I truly enjoy the process of making them. This dal biryani is now going to be on my Biryani rotation.
Ingredients
For the Rice Layer:
- 1 cup Basmati Rice
- 1 Bay leaf
- 3 Cardamom
- 3 Cloves
- 1" Cinnamon stick
- To taste Salt
For the Dal Layer:
- 1 Medium Onion, chopped
- 1 teaspoon Ginger-garlic paste
- ½ cup Tomato puree
- 1 cup Yogurt, whisked
- 1 teaspoon Ground Coriander
- ¼ teaspoon Turmeric
- 1 teaspoon Red chili powder
- 2 cups Cooked Beans
- ¼ cup Cilantro, finely chopped
- ¼ cup Mint, finely chopped
- To taste Salt
Fried Onions:
- 1 Large Red Onion, thinly sliced
Instructions
- For the Rice Layer: Rinse rice well and soak for 30 minutes. Microwave rice along with the other ingredients listed and 1¼cups of water for 7-8 minutes. All the water should be absorbed and rice should be 70-80% cooked through. Set aside until ready to use.
- For the Dal Layer: Heat 1tbsp oil & 1tbsp ghee in a saute pan; add the onions and cook until lightly browned around the edges. Next add ginger+garlic paste and cook for another minute.
- Add tomato puree and cook for 2 minutes.
- Add ground coriander, turmeric, red chili powder and salt to yogurt and whisk well. Add this mixture to the tomato mixture along with cooked dal. Bring to the boil, reduce heat and simmer until the mixture thickens a little bit.
- Next add half of the cilantro and mint. Mix well. Set aside.
- For the Fried Onions: Onions can be deep fried or simply use store-bought fried onions (available in Indian grocery stores). I prefer caramelize onions as they add sweetness to the dish. I cook the sliced onions in 2tbsp oil on medium heat, stirring frequently until caramelized. This takes about 20-30 minutes.
- To Assemble Biryani: In a heavy bottomed deep pan (I use my 6 liter pressure cooker), add ⅓ of the rice, top it with ½ of the dal mixture -- another layer of rice, remaining dal mixture and half of the fried onions -- final layer, remaining rice and fried onions. Top this with the remaining chopped mint and coriander. Cover and cook for 10 minutes on medium flame (I don't put the whistle on the pressure cooker at this point).
Notes
- I used chickpeas, adzuki beans & moong beans -- red kidney beans, whole masoor dal etc are also good choices
- Biryani is ready to serve with either raita or any of your favorite veg. side dish.

Sandhya Ramakrishnan
Beautiful recipe! Love the one pot meals 🙂
Nupur
Pavani- that looks too tempting. My stomach growled just looking at the pic 🙂 Thanks so much for participating in MLLA!
Sayantani
very very new recipe and really well made. am not big fan of meat biriyani, this could be a great option for me.
Priya Suresh
Wat a beautiful,nutritious and inviting one pot meal..Delicious briyani.
Charul @ Tadka Masala
Looks yumm, love the colors. 🙂
sanjana reddy
Delicious recipe..will try this. You can try varieties of south indian foods at South Indian Recipes
Unknown
when to add cooked dals?
Pavani N
Hi Unknown, thank you for pointing that out. Cooked dals need to be added along with yogurt mixture. I updated the recipe accordingly. Hope this helps.