Blogging Marathon# 29: Week 4/ Day 2
Theme: Bookmarked Recipes
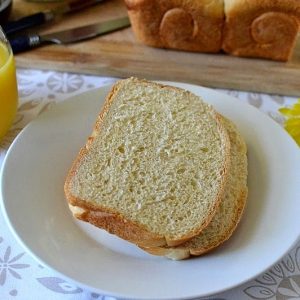
Dish: Hokkaido Bread from Sandhya's My Cooking Journey & Aparna's My Diverse Kitchen
For day 2 of BM# 29 under 'Bookmarked Recipes', I made a bread that was featured on almost all of the food blogs. Every baking group in the blog world baked this amazing Hokkaido Milk Bread using Tangzhong starter. I've drooled over the pictures of a ton of my favorite bloggers and finally I made it and enjoyed it at home. Like the saying goes, "it's better late than never".
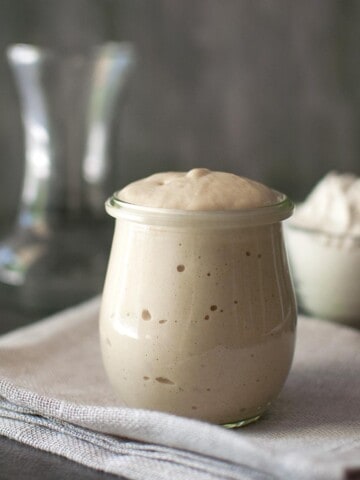
This bread uses 'Tangzhong Starter' unlike Sourdough this is a cooked starter and keeps well only for 3-4 days in the fridge. The resulting bread is super soft and stores well for a longer time.
Starter is made by cooking flour with water and milk. Then it is set aside to cool completely and rest for 2-3 hours. I read somewhere that chilling the starter makes for even better bread, so that's what I did. Then the starter is mixed with the usual bread ingredients to form the dough. This dough is very versatile and can be used to make various baked goods like plain loaf or dinner rolls. You can even stuff them with savory or sweet fillings and even make Pav Buns with it.
One recipe for the bread requires only HALF the starter, the other half can be refrigerated for up to 3 days. I made Whole wheat White bread with one half of the starter and used the other half to make pav buns.
Hokkaido Milk Bread with Tangzhong Starter
Ingredients
For Tangzhong Starter:
- 2 tablespoons (14 grams) Bread flour
- 3 tablespoons (43 grams) Milk, either 2% or whole
- 3 tablespoons (43 grams) Water
For the Bread:
- 1½ cups (180 grams) All purpose flour*
- 1 cup (152 grams) Whole wheat flour
- 1 tablespoon Instant Yeast
- 3 (38 grams) tablespoons Sugar
- 2 tablespoons (14 grams) Dry milk powder
- 1 teaspoon Salt
- ½ cup (113 grams) Whole Milk
- 4 tablespoons (57 grams) Unsalted Butter, melted
Instructions
Make the Starter:
- Combine flour, milk and water in a small saucepan. Whisk until there are no lumps and well combined. Place the saucepan on stove and over medium heat, cook the flour mixture stirring constantly until a smooth roux forms. It is ready when the temperature of the roux is 150°F or 65°C. If you don't have a instant read thermometer, then it is ready when the mixture thickens considerably and it forms lines when whisked.
- Remove the starter into a clean container and place a plastic wrap right on top of the flour mixture. Let the mixture cool to room temperature and rest for at least 2-3 hours before using. Or refrigerate it overnight and use it.
To make the Bread:
- Combine the flours, yeast, sugar, dry milk powder, and salt in a stand mixer bowl or a food processor or large bowl. Whisk milk, and tangzhong starter in a small bowl. Slowly add the wet ingredients to dry ingredients and mix until it forms a sticky dough.
- Add the melted butter and knead the dough until it forms a soft, pliable dough -- this takes about 12-15 minutes in a stand mixer. To test the dough if it's ready, take a small piece and try to stretch it, it should not break right away. When it does break, it should will form a circle.Place the dough in an oiled bowl, cover lightly and let rise until it doubles in volume, about 45 minutes~1 hour.
- Gently deflate the dough and remove onto a work surface. At this point, this dough can be used to make any of the following: 1 (9"x5") loaf bread/ 2 (6"x4") loaves/ 12 muffin rolls or 9 pav buns.Depending on what you want to make, divide the dough accordingly: I made 1 (9"x5") loaf with the first dough and with the other half of the Tangzhong, I made another dough that I used to make 9 pav buns.
- For 9"x5" loaf: Divide the dough into 3 equal parts; roll each part into ⅛" oval. Fold the sides over and turn it over so that the seam side faces down. Roll it out into a 12" oval. Now starting from the farthest side, roll into a tight cylinder and place seam side down in a greased baking pan. Repeat with the other 2 parts. (Sandhya has clear pictures on how to do this).Cover loosely with a plastic wrap and let rise for 45 minutes.
- Preheat oven to 350°F.
- Brush the top of the bread with milk or cream. Bake for 30-40 minutes or until the top is golden brown. Make note that the different size breads bake at different times, so keep an eye on them.
- Remove from oven and invert the bread onto a wore rack and let cool completely before slicing.
Notes
- This bread keeps well at room temperature for at least 3-4 days. Starter keeps well for 3-4 days, once you that there is a change in color--discard it.
- Use 2½ cups (298 grams) of all-purpose flour.

Jayanthi Padmanabhan
This bread looks so professional.. I am generally intimidated by breads.. wonder if I should give it a try..
Priya Srinivasan
Super Soft, Look @ the pores in the bread, i too tried this and enjoyed fluffy home-made bread for the first time!!!
Priya Suresh
Loved making this hokkaida bread, love that prefect crust and beautiful texture.
preeti garg
Super soft bread... awesome
Global Tastes & Travels Inc.
perfect versatile bread for any use
Global Tastes & Travels Inc.
perfect versatile bread for any use
Srivalli
Pavani, when everybody had done this, I was so tempted..wish I would do this sometime..so pretty pictures..
Charul @ Tadka Masala
Your bread looks super soft and moist.. Lovely pics. 🙂
Harini-Jaya Rupanagudi
Love to bake this Pavani. I shall have to bookmark this for sometime in the near future! Beautiful pictures as well!
Manju
Love these soft bread,
Kalyani
Lovely pics.. I saw this all over the blogosphere, and bread somehow intimidates me to know end, esp if I dont get that golden crust.. would you have a measured down version of this Pavani ? just to get me started off say with 1 cup of APF..and the proportions..let me know if you can inbox me too offline.. appreciate the help..Kalyani Sizzling Tastebuds Join us at Magic Mingle with Kiwi & Basil Hosting Kids Delight – Party Food event
Pavani N
Thank you Kalyani. I just sent you an email with details.
s2001
perfect. I am inspired. will u share the measured down version with me ?
Suhasini R
Hello! I scoured the net for recipes and Your recipe for this bread seemed the easiest to follow! And I'm a complete beginner!
I've made the tangzhong ( I've winged it. I don't know if I overcooked it?! Is there a way to tell? I took it off heat as soon as it started to thicken bit it completely thickened after it got to room temperature!)
Your recipe calls for yeast. I have active dry yeast (small granules)
While I'm aware I need to add it to warm milk to activate it, I want to check if the quantity remains as per your recipe card? 2 tsp?
cookshideout
Suhasini, the quantity of 2 teaspoon yeast is accurate.
Hemalatha
One small doubt please - Is it not necessary to proof the yeast ? Is it ok to mix all the dry ingredients together without the yeast setting ? Looking forward to your clarification.
cookshideout
If you are using instant yeast that is relatively fresh, it is not really needed to proof it. But if it is not very sure, then you can proof it before using. Hope this helps. Let me know if you have any further questions.
Pavani
Rebecca
Hi, this recipe looks great and would love to try it. Just wondering please if you have the recipe available in weight for all the ingredients? Just from experience, cup and spoon measurements/sizes can vary quite a bit by country and can make quite a difference with bread recipes and the end result. Would be really grateful if you have those available. Many thanks in advance
cookshideout
Hi Rebecca, thank you for your comment. I updated the recipe to include the weights in grams. Do let me know how the bread turns out when you try it.
Rebecca
Thank you so much! I will do 🙂