Bake-a-thon 2014: Day 6
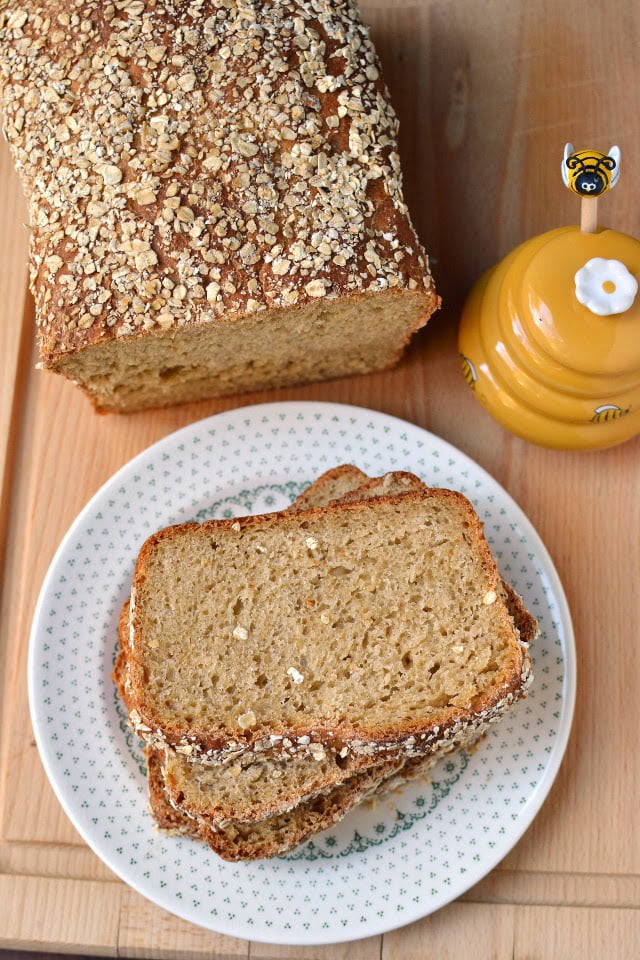
Bake of the day: No Knead Honey Oat Bread
I like baking bread and usually use either my stand mixer or breadmaker to knead the bread. But I recently started making no-knead breads. As the name suggests there is no kneading required to make these breads. No-knead bread was how people made bread thousands of years ago -- before they discovered that by pulling, beating, stretching, stirring or otherwise 'kneading' wheat doughs they could speed up the gluten-developing process. A renewed interest in this technique started after a no-knead bread recipe was published in 2006 in The New York Times.

This no-knead Honey Oat bread is from The Vegetarian Times magazine all the way back from 2010. All the ingredients are mixed together and the dough just sits on a counter and gradually kneads itself. Apart from being easy to make, these no-knead breads have an added buns benefit from the unhurried rise boosts bread flour and aroma. Less Work. More Flavor. Who doesn't like that 🙂

I already have a Whole wheat Oatmeal Bread that I really like a lot. It is a soft and delicious bread. But this no-knead version is equally soft, sweet and yummy -- that too for the fraction of the effort. We had it for breakfast with some jam and nutella and I made a grilled cheese sandwich for my son's lunchbox too. I also used it to make the Fruit & Nut Stuffing for Thanksgiving.
[wpurp-searchable-recipe]No Knead Honey Oat BreadUnbleached Bread Flour - (or use All purpose flour), Whole wheat flour - divided (or use 3½cups of bleached flour), Quick cooking Oats - divided, Salt, Instant Yeast - (can also use rapid rise or bread machine yeast), Honey, more Vegetable/ Canola Oil - for brushing dough and oiling pan, Spread ¾cup of oats on a microwave safe plate. Microwave on high power 1½~2 minutes, stopping to stir every 30 seconds, or until the oats are fragrant and lightly toasted. Cool.; In a bowl, mix 1½cups of water with 1cup of ice cubes.; Combine bread flour, 1¼cups of whole wheat flour, salt, yeast and toasted oats in a large mixing bowl.; Measure 1½cups ice water into a measuring cup, add honey and oil and mix well to combine.; Vigorously stir in honey mixture into the flour mixture. Dough should be slightly stiff, add in just enough additional flour to stiffen dough slightly, if necessary.; Brush top of dough with oil.; Cover bowl with plastic wrap and let rise at room temperature for 8~12 hours.; Vigorously stir dough, scraping down bowl sides. Stir in remaining ¼cup of whole wheat flour. Stir in more flour if dough is at all soft, to have stiff but still stirrable dough.; Oil a 9"x5" loaf pan, transfer dough to pan, and smooth the surface with a spatula or well oiled finger tips. Press remaining ¼cup oats on top of loaf. Cover with lightly greased plastic wrap.; Let dough rise 1¼~2½ hours at room temperature.; Preheat the oven to 375°F. Remove plastic wrap and bake loaf for 30~35 minutes or until the top is well browned. Cover with foil and bake for another 25~30 minutes more or until an instant read thermometer inserted into the center of the bread registers at least 190°F.; Cool in pan for 5 minutes before removing it onto a wire rack. Cool completely before slicing.; [/wpurp-searchable-recipe]
Ingredients
- 2 cups Unbleached Bread Flour or All purpose flour
- 1½ cups Whole wheat flour, divided
- 1 cup Quick cooking Oats, divided
- 1¾ tsp Salt
- 1 tsp Instant Yeast (can also use rapid rise or bread machine yeast)
- 6 tbsp Honey
- ¼ cup Vegetable/ Canola Oil, plus more for brushing dough and oiling pan
Instructions
- Spread ¾cup of oats on a microwave safe plate. Microwave on high power 1½~2 minutes, stopping to stir every 30 seconds, or until the oats are fragrant and lightly toasted. Cool.
- In a bowl, mix 1½cups of water with 1 cup of ice cubes.
- Combine bread flour, 1¼cups of whole wheat flour, salt, yeast and toasted oats in a large mixing bowl.
- Measure 1½cups ice water into a measuring cup, add honey and oil and mix well to combine.
- Vigorously stir in honey mixture into the flour mixture. Dough should be slightly stiff, add in just enough additional flour to stiffen dough slightly, if necessary.
- Brush top of dough with oil.
- Cover bowl with plastic wrap and let rise at room temperature for 8~12 hours.
- Vigorously stir dough, scraping down bowl sides. Stir in remaining ¼cup of whole wheat flour. Stir in more flour if dough is at all soft, to have stiff but still stirrable dough.
- Oil a 9″x5″ loaf pan, transfer dough to pan, and smooth the surface with a spatula or well oiled finger tips. Press remaining ¼cup oats on top of loaf. Cover with lightly greased plastic wrap.
- Let dough rise 1¼~2½ hours at room temperature.
- Preheat the oven to 375°F. Remove plastic wrap and bake loaf for 30~35 minutes or until the top is well browned. Cover with foil and bake for another 25~30 minutes more or until an instant read thermometer inserted into the center of the bread registers at least 190°F.
- Cool in pan for 5 minutes before removing it onto a wire rack. Cool completely before slicing


Srivalli
I love all the breads you bake Pavani, the texture looks amazing!..
Varadas Kitchen
I really like the flavor of the no knead bread. The toasted oats on this one enhance the flavor. Nice crumb.
Usha Rao
The bread turned out perfect. It looks just like store bought bread.
Kalyani
Am definitely making this pavani.. Less effort great taste.. Can u let me know what the ice water is for ? Just curious ....
Saras
Woow .Superb clicks.. Love the texture!!
Sowmya Sundararajan
You are a daring baker Pavani.
Priya Suresh
Wish i get few slices of this bread rite from my lappy screen, prefectly baked bread.
Pavani N
Kalyani, I wasn't sure either but this is what I found online. Using ice cold water retards yeast activity (or the first fermentation process) -- which has the benefit of giving many flour enzymes the time to improve dough texture and flavor without competition from the yeast. This helps produce loaves with a depth of flavor and aroma notes almost never found using the traditional, or “straight” method.You should definitely try the loaf 'cos like you said it has less work -- awesome results 🙂
Priya Srinivasan
No Knead, then definitely bookmarked!!! 🙂 What a great texture pavani, looks perfect!
Global Tastes & Travels Inc.
this bread looks AMAZING - I've pinned it to try!
Global Tastes & Travels Inc.
this bread looks AMAZING - I've pinned it to try!